Growing your own green peppers can be a rewarding experience, allowing you to enjoy the freshness and flavor of homegrown produce. Whether you’re a seasoned gardener or a beginner, this step-by-step guide will provide you with the essential information you need to successfully plant green peppers in your garden. From selecting the right time to harvest, we’ll walk you through each stage, offering helpful tips and insights along the way. By following these instructions, you’ll be on your way to cultivating healthy green pepper plants and savoring the taste of your own homegrown peppers. Let’s dive in and discover the joy of growing this versatile vegetable!
- Choose the Right Time: Green peppers thrive in warm weather, so it’s best to plant them when the threat of frost has passed and the soil temperature is consistently above 60°F (15°C). This usually occurs in the spring, but it can vary depending on your location. For example, if you live in a colder climate, you may need to start seeds indoors and transplant them outdoors once the weather warms up.
- Select a Suitable Location: Find a sunny spot in your garden that receives at least 6-8 hours of direct sunlight daily. Green peppers love sunlight and need it to grow and develop their sweet flavors. Ensure that the location you choose is sheltered from strong winds, as excessive wind can damage the delicate pepper plants.
- Prepare the Soil: Clear the area of any weeds or grass. Loosen the soil to a depth of about 8-10 inches (20-25 cm) using a garden fork or tiller. Remove any rocks, debris, or large clumps of soil. Incorporate organic matter such as compost or aged manure into the soil to improve its fertility, moisture retention, and drainage. This helps create a nutrient-rich environment for the green pepper plants to thrive.
- Planting Seeds: If you’re starting from seeds, sow them indoors about 8-10 weeks before the last expected frost date. Fill seed trays or pots with a high-quality seed-starting mix. Plant the seeds about ¼ inch (0.6 cm) deep and cover them with a thin layer of soil. Moisten the soil gently, ensuring it is evenly moist but not waterlogged. Place the containers in a warm location, such as near a sunny window or under grow lights. Keep the soil consistently moist and provide adequate ventilation to prevent mold or fungal growth. Once the seedlings have grown to about 3-4 inches (7-10 cm) tall and the weather has warmed up, you can transplant them outdoors.
- Transplanting Seedlings: Dig holes in the prepared soil that are slightly larger than the root ball of each seedling. Space the holes about 18-24 inches (45-60 cm) apart to allow the plants enough room to grow. Before transplanting, harden off the seedlings by gradually exposing them to outdoor conditions over a period of 7-10 days. This helps acclimate them to the sun, wind, and temperature changes. Gently remove the seedlings from their containers, being careful not to damage the roots, and place them in the holes. Backfill the holes with soil, firming it gently around the base of the plants to provide stability.
- Caring for Green Pepper Plants: After transplanting, water the plants thoroughly to settle the soil around the roots. Keep the soil consistently moist but avoid overwatering, as excessive moisture can lead to root rot. Apply a layer of organic mulch, such as straw or shredded leaves, around the plants to help retain moisture, suppress weed growth, and regulate soil temperature. Monitor the moisture levels regularly and water deeply when the top inch of soil feels dry. Fertilize the plants every 4-6 weeks with a balanced fertilizer or a slow-release granular fertilizer specifically formulated for vegetables. This ensures the green pepper plants receive the necessary nutrients for healthy growth and abundant fruit production.
- Provide Support: As the green pepper plants grow, they may benefit from some support to prevent the branches from drooping under the weight of the fruit. Place stakes or install cages near each plant to provide support and keep the plants upright. Gently tie the branches to the stakes or cage using soft garden twine or plant ties, allowing enough room for the stems to grow without constricting them.
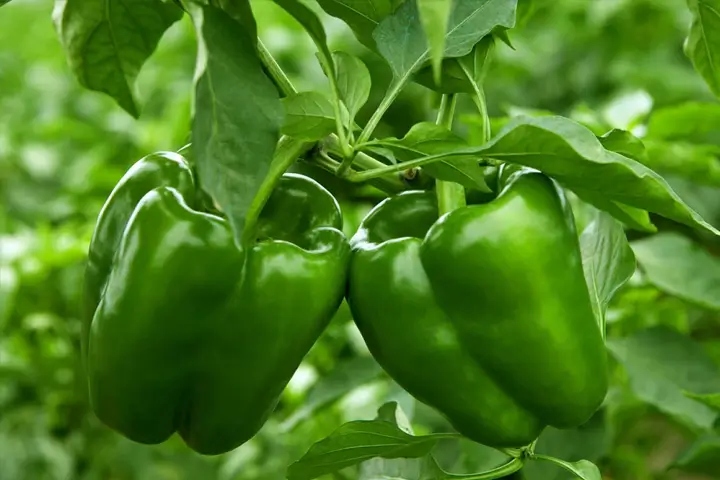
- Harvesting Green Peppers: Green peppers can be harvested when they reach the desired size and color. Typically, they are picked when they are still green and firm. However, if you prefer ripe red or yellow peppers, allow them to stay on the plant longer until they change color. Use garden shears or a sharp knife to cut the peppers off the plant, leaving a short stem attached. Harvest regularly to encourage continuous production and to prevent the plants from becoming overcrowded.
By following these step-by-step instructions, you can successfully plant and grow your own green peppers, enjoying the satisfaction of harvesting fresh, flavorful produce from your garden. Remember to provide proper care, monitor for pests or diseases, and adjust your watering and fertilization practices as needed. With patience and diligence, you’ll be rewarded with a bountiful harvest of delicious green peppers. Happy gardening!
Stay updated with the latest farming tips and agriculture industry news from Africa by subscribing to our newsletter. Don’t miss out on valuable insights and updates. Follow us on Twitter, LinkedIn, and Facebook to join our farming community and stay connected with us.


Leave a Reply